

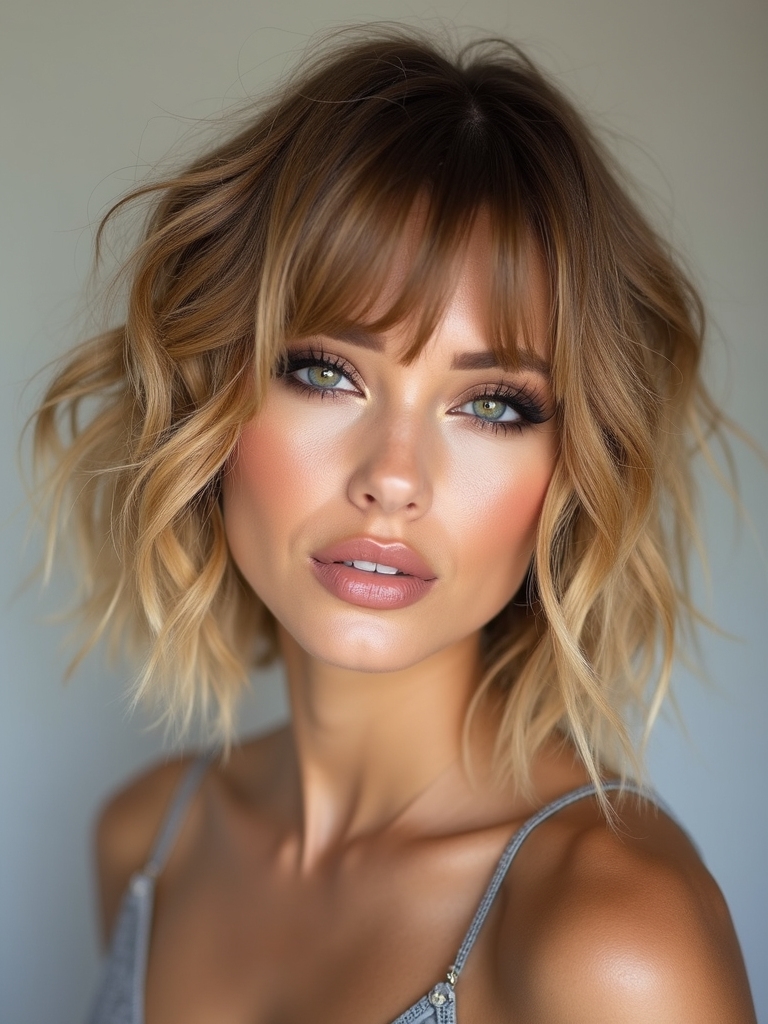
A shag photographed in 1976 and a shag photographed last week share almost nothing beyond the name. The original was blunt, boxy, and bleached hard by studio lights; the version filling salons now is airier, more layered, and built to look accidental rather than teased into place.
Sixteen versions of the shape follow, sorted by length, texture, and finish, each with the specific cutting detail that separates it from a plain layered cut.
What Actually Defines a Shag
- Heavy internal layering, not the outline, is what separates a shag from a standard layered cut.
- The layering technique shifts by hair type: curls need a dry cut, thick hair needs weight removed, fine hair needs a gentle hand.
- Upkeep sits mostly at the salon chair; daily styling stays minimal by design across nearly every version.
An Airy, Modern Take on the Shag

The original shag leaned on heavy, blunt layering and a stiff finish that needed serious styling to hold. Reworked for now, the same bones carry lighter, piecier layers that move rather than sit.
What Changed Since the Seventies
Point-cut ends replace the dense, blown-out edges of the earlier version, trading bulk for texture. That single change accounts for most of what separates a current shag from a costume version of one.
The shape adapts to nearly any length or texture, part of why it keeps resurfacing decade after decade with real staying power.

A Choppy, Textured Shag Pixie

Cropping the shag down to pixie length concentrates all of its texture into a small space. Choppy, disconnected layers stack through the crown while staying close at the perimeter, producing real volume without any real length to work with.
- The lowest-upkeep version of the whole family, day to day.
- A small amount of paste worked through with fingers is typically the entire routine.
- Best suited to anyone wanting short hair with visible texture rather than a smooth crop.
A Curly Shag Built From Layers

Curl pattern and heavy internal layering turn out to be a strong match, since removing weight from inside the cut gives each curl room to spring rather than pull flat under its own density. A dry cut matters more here than almost anywhere else, since curls cut wet and stretched routinely end up shorter and less even than planned.
- Layers placed while the curl is fully sprung, not stretched, hold their shape correctly.
- A curl cream worked through damp hair, then air-dried or diffused, is usually all the styling required.
- Our curly shag guide covers this version in far more depth.
Two words that come up constantly when discussing this shape with a stylist.
📖Point-cutting
Cutting vertically into the ends rather than straight across, breaking a hard line into soft, irregular pieces.
📖Disconnection
A deliberate, visible jump in length between two sections of a cut, rather than a smooth blend.
A Wavy, Shoulder-Length Textured Shag

At shoulder length, natural waves and heavy layering complement each other directly, since the layering gives the wave more edges to bend and separate around.
Where the Cut Meets the Bend
Feathered ends thin out just enough for individual pieces to separate and move on their own, most of what makes this version photograph as easily as it wears day to day.
A salt spray worked into damp hair, followed by air-drying or a rough dry with fingers, typically finishes the look without any additional tools.
Long, Feathered Layers With Soft Movement

Kept at full length, a shag can carry real texture without sacrificing the reach and versatility longer hair offers, since the layering concentrates mostly at the ends and around the face.
Feathering removes weight along the perimeter without shortening the overall length, the specific mechanic that finally lets long hair swing instead of hanging as one heavy sheet.
This version tends to suit anyone drawn to the texture of a shag who isn’t ready to commit to cutting off meaningful length to get it.
An Edgy, Tousled Wolf-Shag Hybrid

Crossing a shag with a wolf cut produces the most dramatic version on this list: a heavily layered, spiked crown sitting over longer, shaggier lengths below.
The visible gap between the short top and long bottom carries the whole look; a stylist cuts real distance between those sections and leaves it deliberately unblended.
- The boldest, highest-contrast version available in this family of cuts.
- A matte paste through the crown and a light texture product through the lengths keeps both zones distinct.
- Best suited to anyone specifically chasing maximum visual drama, not a subtle refresh.
👍What This Version Gets Right
- +Keeps nearly all existing length
- +Grows out with almost no awkward stage
- +Works on straight, wavy, or curly hair alike
👎Where It Falls Short
- –Takes longer to style than shorter versions
- –Texture reads more subtle than a cropped shag
- –Needs consistent product to avoid looking merely long rather than shaped
A Layered Shag With a Curtain Fringe

Pairing the layered shape with a center-parted curtain fringe that sweeps to both sides creates one continuous silhouette across the whole front of the cut.
The shortest fringe pieces feed straight into the layers framing the face, the specific detail that keeps the transition from reading as a hard line.
This combination tends to flatter a wide range of face shapes and grows out with unusual grace, since there’s no sharp edge anywhere in the design to maintain.
A Shag With a Bold Micro Fringe

Pairing the shag’s soft, piecey layers with a short, blunt fringe cut high above the brow creates deliberate contrast between two very different textures in one cut.
The fringe itself gets notched, not left perfectly blunt, tying it back into the choppier texture surrounding it.
This is the highest-upkeep pairing in the group, since a micro fringe grows into the eyeline within roughly two weeks. Many salons handle that standalone fringe touch-up for around $15 a visit, well below the cost of a full reshape.
A Choppy, Fringed Shag Mullet

Combining the shag’s rebellious original spirit with a mullet’s structure produces a short, textured crown over a longer, ragged tail at the nape, finished with a piecey fringe up front. The visible break between the cropped top and trailing back is specifically what earns it the mullet label.
- The most defiant, attitude-forward version on this list by a wide margin.
- A matte clay roughs up both the crown and the fringe for a cohesive, undone finish.
- See our pixie mullet guide for a more cropped take on the same idea.
A Razor-Cut Shag for Airy Movement

Slicing the ends with a razor produces the lightest, most weightless version of the shag available, since the blade tapers each strand to a fine point instead of a flat edge.
Where Restraint Matters Most
That taper is what makes hair read as though it carries more separate pieces than it actually does, a trick that flatters fine to medium hair looking for extra visual movement.
Overdone, the same technique thins hair past a healthy point, so restraint from the stylist matters here more than with almost any other cutting method.
Layered Volume for Fine Hair

Fine hair benefits from the shag’s layering in a specific way: choppy, separated pieces read as more substantial than they actually are, building the appearance of body the hair doesn’t naturally carry.
The risk sits in over-thinning. Removing too much weight leaves fine hair looking sparse and thin, so a lighter hand than usual decides whether this version succeeds.
- Best kept at shorter to mid lengths, where the layering effect reads most clearly.
- A lightweight mousse and a little root lift hold the volume through the day.
- Ask specifically for gentle layering, not heavy thinning, at the consultation.
💡Check Hair Condition First
Razoring works best on hair that’s already in reasonably strong condition. Very dry, coily, or chemically processed strands tend to fray and roughen under the blade rather than taper cleanly.
A Weight-Removed Shag for Thick Hair

Thick hair runs into the opposite problem from fine hair: too much density, which can sit as one heavy, largely motionless mass regardless of length.
Internal layering carved out from underneath removes that bulk while the outer shape stays full, letting the cut move freely instead of sitting like a solid block.
- Debulking is the actual goal for this hair type, since the length itself usually stays put.
- The perimeter stays visually full even as significant weight comes out from inside.
- A texture-defining product, applied sparingly, keeps the lightened layers from reading flat.
A Feathered Shag With Real Grit

Pushing the feathering further than a standard shag produces deeply broken, piecey ends for a rougher, more aggressive finish than the softer versions in this family carry.
A matte clay worked specifically through the ends defines that broken texture; anything glossy tends to weigh the pieces back down into one clump rather than keeping them separated.
An Airy Layered Shag With a Curtain Frame

Combining light, feathered layering with soft curtain bangs produces a noticeably gentler, more romantic version than the grittier shags elsewhere on this list.
The fringe and the surrounding layers blend into one continuous frame around the face, keeping the whole front of the cut reading soft and unified.
This pairing suits anyone drawn to the shag’s movement without wanting the harder, more textured edge some versions carry.
Dimensional Color That Follows the Movement

Color changes how a shag’s texture reads at a distance, since strategic highlights or lowlights catch the layers as they move.
Placement Over Technique
A shag’s already-broken structure gives color somewhere specific to land, so placement matters more here than the particular technique chosen; the goal is brightness landing exactly where the layers separate.
A colorist working with this cut typically concentrates the boldest tone specifically where the layers move most.
Styling the airy curtain version at home.
1Rough-dry with fingers first
Get hair to roughly 80% dry before introducing a brush or tool, which preserves the natural separation of the layers.
2Set the fringe last
A round brush, used only on the fringe section, sweeps it into place without smoothing out texture in the rest of the cut.
Easy, Air-Dried Texture and Upkeep

Skipping heat tools entirely still works on a shag, since the cut itself builds the texture; any blow-drying technique layered on top is optional polish.
A small amount of texture cream worked through damp hair, left to dry naturally, produces a finished look without any additional styling step. On a second or third day, a quick tousle and a spritz of dry texture spray typically revives the whole shape in under a minute.
Shag Cut Questions
?How much length is typically lost getting a shag?
Less than most people expect, since the shape comes primarily from internal layering. A stylist can often add shag texture to hair that’s already at a preferred length, removing weight from inside while leaving the visible length mostly untouched.
?Does a shag work on hair that’s been color-treated or is a little damaged?
Generally yes, though the specific cutting technique should shift to match the hair’s condition. Point-cutting is gentler on compromised strands than razoring, which can fray already-fragile ends further.
?What’s the easiest way to tell a good shag from a mediocre one in a photo?
Look specifically at how the layers catch light and separate, not just the overall shape. A well-cut shag shows distinct pieces moving independently; a flatter, single-toned mass usually means the layering wasn’t cut deep enough into the interior to actually work.
Built to Keep Coming Back
Every era rediscovers the shag because the core mechanism never stops working: heavy internal layering that fakes movement and volume regardless of length or texture. What’s changed since the seventies is mostly restraint: lighter layers, softer ends, and a finish built to look accidental.
Before committing to a specific version, bring a photo that shows the actual layering pattern, not just the general silhouette, and ask directly whether the cut should be point-cut, razored, or dry-cut for the hair in question.
More to Explore





