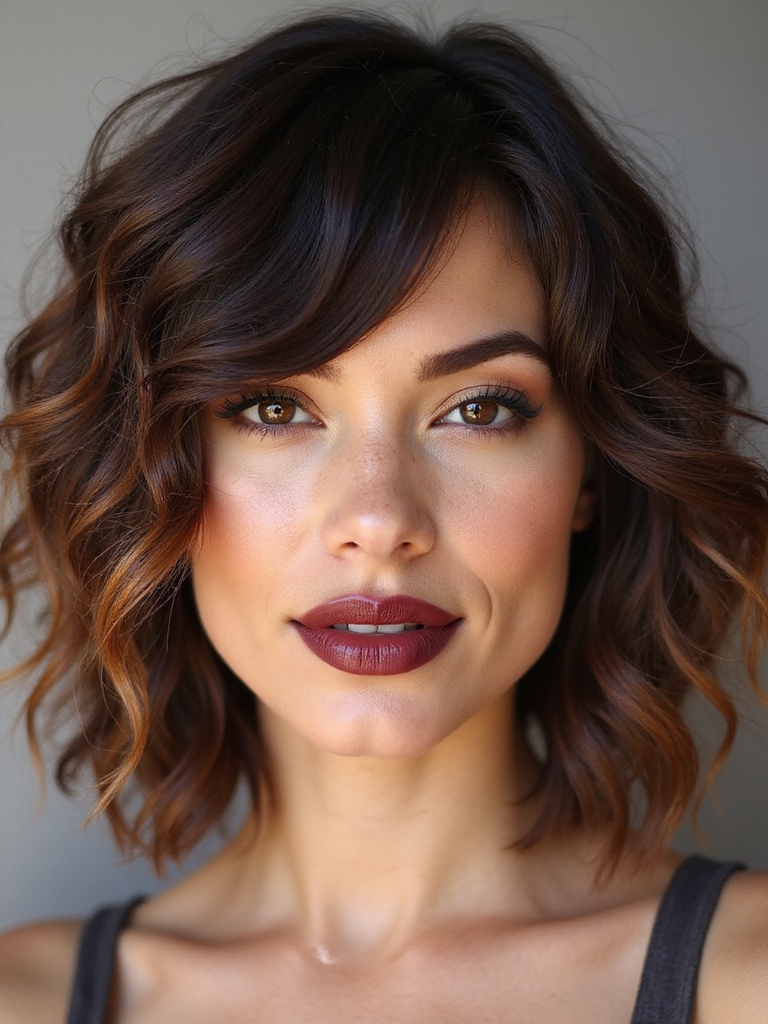
Can a mullet really work on curly hair? It is the question I get the second someone shows me the photo, usually half-hoping I will say yes. The answer is not just yes. Curls might be the texture this cut was waiting for. All that natural volume and movement is exactly what a shag mullet is built to put on display.
A curly shag mullet marries three ideas: the disconnected length of a mullet shag, the choppy interior layers of a shag, and the spring of your own curl pattern. Cut right, and cut dry, it turns shrinkage and bulk into shape and attitude. Here are fifteen versions, from soft ringlets to bold coily crops, with the honest styling notes each one needs.
Curl Pattern, Quick Guide
| Curl pattern | What the cut does | Styling note |
|---|---|---|
| Loose curls (2c-3a) | Adds piecey movement and a defined tail | Air-dry with a light cream |
| Springy curls (3b-3c) | Removes weight so curls clump and bounce | Diffuse with a curl gel |
| Coils and kinks (4a-4c) | Builds shape and a bold crown without bulk | Shingle a thick custard, then diffuse |
Curly Wolf Cut Mullet

The curly wolf cut mullet is the loudest member of this family, a mash-up of a wolf cut’s heavy, choppy layers and a mullet’s longer tail. On curly hair the effect is dialed all the way up: the layers free your curls to expand at the crown while the tail keeps its length and weight.
It is bold, undone, and made for someone who wants their texture to be the whole statement. Subtle it is not. If you love drama and do not mind a curl-savvy stylist’s price tag, this is the one. See the straighter take in our wolf cut for curly hair.
Soft Shag Ringlets

Not every curly shag mullet has to shout. This softer version uses gentle shag layering to encourage loose, bouncy ringlets into a romantic, wearable shape, with just enough mullet length in back to keep it interesting.
Why layers help curls
It suits looser curl patterns beautifully, the kind that clump into defined spirals with a little cream. The layers stop those spirals from stacking heavy and flat at the bottom.
Style it on soaking-wet hair with a curl cream, scrunch upward, and air-dry or diffuse on low. Resist touching it until it is fully dry, or you will scatter the curl into frizz.
ℹ️Good to Know
Curly hair can shrink by half or more as it dries. A good stylist cuts a curly shag mullet dry, in its natural state, so the finished shape matches the hair you actually walk around in.
Micro-Fringe Coily Shag Mullet

A micro fringe over coily texture is a striking, fashion-forward take on the curly shag mullet. Tight coils are cropped into a short, blunt curly fringe up front, balanced by a layered, longer mullet tail. On 4-type textures, the contrast between the cropped fringe and the fuller crown carries real impact.
- Best on coils and kinks that hold a defined, blunt curly fringe
- Keep coils moisturized so the fringe shape stays springy and even
- Refresh the fringe with water and a little custard between wash days
Elongated Tail Curly Shag

The elongated tail is the mullet detail that anchors this whole look. Letting the back grow long while the layers keep the crown and sides full gives a curly shag mullet its signature silhouette: short and textured up top, dramatic in back.
It is a smart pick if you want to keep length you have already grown. The tail can be worn loose, clipped up, or tucked, and on curls it never reads as a costume because the texture keeps it current. Compare it with the shaggy mullet on straighter hair.
Pick your curly shag mullet by what you want most.
🎯Maximum volume
Go for a volumized crown or wolf-cut layering and diffuse upside down.
🎯Easy upkeep
Choose soft ringlets or an air-dry shape and skip the heat entirely.
Volumized Crown Curly Shag Mullet

If volume is the goal, this is your version. A volumized crown takes the natural lift curls already have and pushes it further, with short, stacked layers at the top that give serious rock-and-roll height.
Getting lift at the roots
It works on almost every curl pattern, but it is spectacular on springy 3-type curls that already want to rise. The shape turns that tendency into a deliberate, sculpted crown.
Build it by clipping the roots while drying, or simply flip your head and diffuse upside down. A curl mousse holds the height without a crunchy cast.
Face-Framing Curly Shag Mullet

Face-framing is where a curly shag mullet gets personal. Shorter curls cut around the face soften your features and put definition right where people look first. The framing is tailored to your curl pattern, so it springs into the right spot as it dries.
This detail flatters every face shape because your stylist places it to balance your proportions. On rounder faces, longer framing pieces add length; on longer faces, fuller side curls add width.
It is the most universally flattering element of the cut, and the easiest to ask for. Start here if you are unsure. Bring a photo and point to where you want the shortest curl to land.
📋Daily curl care for a shag mullet
- ✓Cleanse gently and condition every wash to keep curls hydrated
- ✓Apply stylers to soaking-wet hair, then scrunch and leave alone
- ✓Protect curls at night with a satin bonnet or pillowcase
Wet-Look Curly Shag Mullet

For a high-shine, editorial finish, the wet look leans into product. A generous layer of gel over defined curls gives a sleek, glossy surface that photographs beautifully and lasts all night.
It is a going-out style more than a daily one, since that much product needs washing out afterward. Apply gel to soaking-wet, defined curls, scrunch, and either air-dry or diffuse for a softer version of the same finish.
Tousled Spiral Curly Shag

The tousled spiral shag is the relaxed, everyday curly mullet. Defined spirals are encouraged to fall in a soft, undone way, with the shag layers giving them room to move and the mullet tail adding length in back.
It is the version I recommend most for daily wear, because it looks intentional even on a second or third day. A quick morning refresh brings the spirals back to life.
- Refresh with a water-and-leave-in mist, then scrunch
- Sleep with curls pineappled on top or on a satin pillowcase
- A trim every three months keeps the spirals defined
“The single biggest mistake I see with curly mullets is cutting them wet. Curls spring up as they dry, so a wet cut almost always lands too short. Find someone who cuts curl by curl, dry.”
Asymmetrical Curly Shag Mullet

An asymmetrical curly shag mullet breaks the symmetry on purpose, with one side cut shorter or angled differently from the other. On curly hair the effect is high-impact and modern, since the texture softens the asymmetry and keeps it from looking too severe or architectural.
- Best for someone who wants a bold, fashion-forward shape
- Works on most curl patterns, but needs precise dry cutting
- Expect a reshape every six to eight weeks to hold the angles
Razor-Cut Curly Shag

A razor on curly hair is a divisive subject, and an honest one. Used carefully on the right curls, it tapers ends to a feathery, airy lightness. Used carelessly, it roughs up the cuticle and triggers frizz and breakage.
This is not a technique for tight coils or fragile hair. Save it for healthy, looser curls and a stylist who has shown you curly razor work they have actually done.
- Only on healthy, looser curl patterns
- Skip it entirely on dry, fine, or coily hair
- Ask to see the stylist’s curly razor portfolio first
Defined Curly Bangs

Curly bangs are having a real moment, and on a shag mullet they are a showpiece. A set of defined, springy curls cut as a fringe frames the eyes and adds a playful, retro note, with the sides tapered to blend into the layers.
The key is cutting them dry and a touch longer than you think, because curly bangs shrink up fast once they dry. Refresh them daily with a little water and cream to keep the curl pattern crisp. Our curly curtain bangs guide has more.
Color Blocking on a Curly Shag Mullet

Color blocking takes the dimension of a curly shag mullet and amplifies it with bold, contrasting panels of color. Placed along the layers, the color catches every curl and turn, so the shape looks even more sculpted. It is the most expressive, high-commitment version here.
- Budget $150 to $300 and up for the color work, plus upkeep
- Curls are fragile, so insist on a colorist who bonds and conditions
- Refresh roots and tone every couple of months
Air-Dry Curly Shag Mullet

For curls, air-drying is not a compromise, it is often the best finish there is. A curly shag mullet built to air-dry is cut so the layers fall and clump correctly with zero heat, which keeps the hair healthy and the curls springy.
Beating frizz on air-dry days
It is the lowest-effort, lowest-damage way to wear the cut, and the one I push hardest for fragile or color-treated curls. Heat is the enemy of long-term curl health.
Apply your styler to soaking-wet hair, scrunch once, and walk away. The less you touch it as it dries, the more defined and frizz-free it sets.
Accessorizing a Curly Shag Mullet

A curly shag mullet is a perfect canvas for accessories. Clips, headscarves, and bandanas all sit beautifully against the texture, and they double as a quick fix for a flat crown or a second-day refresh that needs help.
A silk scarf tied around the crown protects curls and adds a retro touch, while a few small claw clips can pin back the framing or lift the volume. Accessories let you restyle the cut with no heat at all.
Growing Out a Curly Shag Mullet

Every bold cut eventually faces the grow-out question, and the curly shag mullet handles it better than most. Because the shape is already disconnected and textured, it grows into softer curly layers without an awkward, shapeless phase, which is exactly what I tell nervous first-timers.
- Keep the layers trimmed every few months as it grows
- Let the tail catch up while you soften the crown gradually
- Lean on accessories and refreshes during the in-between stage
Who It Suits Best
A curly shag mullet rewards anyone whose hair has natural curl or coil and a personality to match. It is happiest on 3-type and 4-type textures with enough density to fill out the layers, though looser 2-type waves can carry the softer versions. What matters more than pattern is willingness: this is a cut for people who want their texture seen, not smoothed away.
It is less ideal if you blow your hair straight most days or want a wash-and-go you never think about, since curls always ask for some product and care. Budget $80 to $150 for a proper dry curly cut, find a truly curl-trained stylist, and the cut will reward you. Skip the cheap chain chair for this one.
The Curl-Forward Future of the Mullet
The curly shag mullet is proof that the most exciting cuts right now are the ones built around natural texture instead of against it. What used to be hidden or straightened is the whole point here, and that shift is not slowing down.
Whether you go for soft ringlets or a bold coily crop, the move is the same: find a stylist who cuts curls dry and treats your pattern as the feature it is. Do that, and a curly shag mullet becomes the rare cut that looks better the more it looks like you.


