
A client came in last spring with curls hanging in a dense, flat triangle, sure her hair was the problem. It was not. Her hair had been cut all one length for a decade, and the weight was crushing every curl flat. We took out bulk where the curls needed room, built shape where they needed lift, and she watched her own hair rise off her shoulders.
That is the whole story of curly layered hair. Cut so the layers suit the natural pattern, curls spring and define. The catch is doing it right: reading your curl pattern, placing the layers to match, and shaping the hair dry. This guide walks the full picture.
Curly Layers at a Glance
Why layer curly hair at all? One length lets curls pile into a heavy triangle. Layers remove weight so each curl can rise and form. The aim is to shape the hair, never to thin it.
Wet or dry cut? Dry, in the curl’s natural state. Curls shrink as they dry, so a dry cut lets the stylist place each layer exactly where it lands.
How much upkeep? Curls hide grow-out well, so layered curly hair stretches eight to twelve weeks between trims. Most of the work is moisture, not scissors.
Why Layering Helps Curly Texture

Left all one length, curly hair piles into a heavy, triangular shape: flat and dense at the roots, wide at the ends. Layering breaks that up. Removing weight gives each curl room to spring and form, so the silhouette balances out.
The goal of curly layers is to shape the hair, never to thin it. Well-placed layers lift the curls at the crown, control width at the bottom, and let each spiral or coil define on its own. That is the difference between curls that bounce and curls that sit heavy.
I see this transformation most weeks in the chair. The same head of hair, cut with layers that respect the pattern, suddenly has shape and movement it never showed before. The rest of this guide covers exactly how that happens, style by style.
Find Your Curl Pattern and Density First

Before any layering, know what you are working with. Curl pattern runs from loose waves through springy ringlets to tight coils, and each behaves its own way when layered. Density matters just as much as pattern, and the two together tell a stylist where to place the layers and how far to go.
- Fine or sparse curls need light layering to hold the fullness they have
- Thick, dense curls often need weight removed so they can move and breathe
- Looser patterns carry longer layers; tighter coils suit shorter, shape-building ones
Layers do not fix curly hair. They get out of its way, so the pattern you already have can finally show.
Face-Framing Layers for Soft Definition

Face-framing layers shape the curls right around the face, drawing the eye to your features and softening the front. On curls, the framing pieces get room to spring and define at the front. They are a low-commitment way into layers, since they change the front of the cut and leave most of your length alone.
The easiest place to start
Placement is everything. Start the framing at the cheekbone and it lifts and lengthens the face. Drop it to a chin-grazing frame and it eases a fuller face. A leave-in keeps those front curls defined through the day.
If you are not ready for a full layered cut, this is where I send curly clients first. It grows out softly into the rest of the hair, and it works alongside curly bangs if you want a fringe later. Browse more curly hairstyles to see how framing changes a face.
The Curly Shag for Shape and Movement
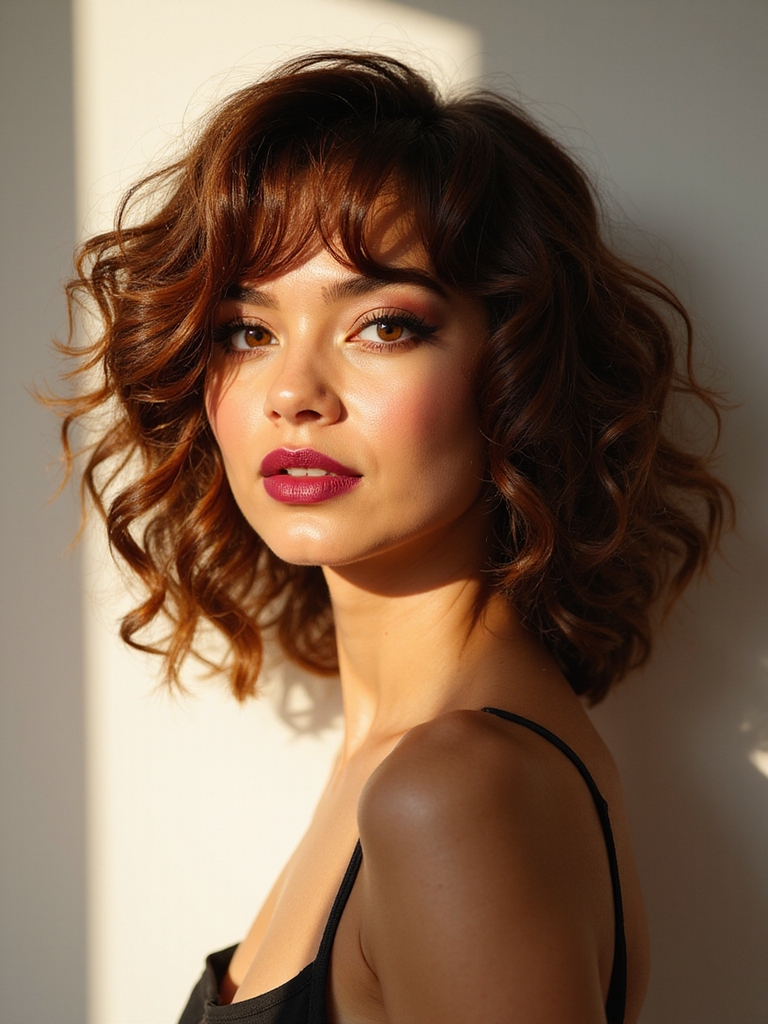
The curly shag layers the hair heavily for shape and movement, letting the curls spring through choppy, undone layers. It is the cut most tied to the layered-curl trend, and for good reason: the layering gives curls maximum room to move, so the shape looks full and bouncy.
It suits a relaxed style with plenty of texture, and it asks little of you day to day beyond a refresh. Our full curly shag guide breaks down the cut if you want the detail.
- Heavy layering for maximum bounce and a soft, undone shape
- Grows out gracefully, so trims can stretch further apart
- Needs little daily styling beyond a water-and-cream refresh
Not sure which layered shape fits? Start with how much length you want to keep.
🎯Keep most of your length
Long layers add bounce through the ends while the length stays, with an almost invisible grow-out.
🎯Want a fresh, lighter feel
A shoulder-length or bob-length layered cut takes off weight and feels bouncy and modern.
🎯Ready for a statement
A curly shag or wolf cut piles on texture for maximum volume and edge.
Long Layers That Keep Length and Bounce

If you love your length, long layers add bounce without taking much off. The layering concentrates through the mid-lengths and ends, so the curls move and spring while the length stays. Long curly hair tends to hang heavy under its own weight, and long layers relieve just enough of that to bring the curls back to life.
It is a gentle, low-commitment way to shape long curls, and it grows out almost invisibly. A diffuser brings out the bounce the layers create.
- Length stays while the mid-lengths and ends gain movement
- Grows out with no visible line, ideal for the commitment-shy
- Best read by curl pattern, so start there before booking a cut
Shoulder-Length Layers for Everyday Wear

Shoulder length is a sweet spot for layered curls. It is long enough to tie back and short enough to stay light, and layers at this length keep the curls from piling into a triangle. This is the cut I recommend most to clients who want one style that does everything.
Wear it down, pin it up, or pull it into a puff: the layers keep it full and defined whichever way you go. It suits most patterns, with the placement nudged shorter or longer for tighter or looser curls.
A refresh with water and leave-in wakes the curls back up between washes, which matters at this length because the ends touch your shoulders and lose definition with friction.
A few terms your curl stylist will use:
📖Shrinkage
How much a curl draws up as it dries, sometimes to half its stretched length. The reason curls are cut dry.
📖Debulking
Removing weight from the interior and lengths to lighten thick curls, without thinning the ends.
📖Cast
The light crunch a gel leaves once curls dry. Scrunch it out for soft, defined curls.
Rounded Shapes That Balance Volume

A rounded layered shape spreads curly volume evenly, so the hair sits balanced from every angle. The layers build a full, even silhouette around the face, and they are the antidote to the bottom-heavy triangle so many curlies fight. Width stays controlled at the bottom while volume lifts at the crown.
It flatters because it puts the fullness where you want it. A rounded shape works because of three things below.
- Keeps the volume balanced and settles the width at the ends
- Lifts the crown, where curls so often fall flat
- Frames the face evenly for a clean, finished outline
Wolf Cut Layers With Curl-Friendly Edges

The wolf cut brings heavy, choppy layering to curls for dramatic volume and edge. Curl-friendly cutting keeps the ends full and springy, so the layers move as one shape. It is the boldest layered curl on this list, piling texture from crown to ends.
It suits someone who wants their curls to make a statement and does not mind a little styling to keep the pieces defined. The fringe and front layers do most of the talking, so the cut feels personal fast.
As with every curly cut here, it is shaped dry so the layers fall where the curls naturally sit. This is the look my boldest clients ask for by name lately, usually after seeing it move on someone else.
👍What layered curls give you
- +Volume lifts at the crown and width settles at the ends
- +Each curl gets room to spring and define on its own
- +Grow-out is soft, so trims can stretch further apart
👎What to keep in mind
- –A dry, curl-by-curl cut costs more and takes longer
- –Very fine or sparse curls need only the lightest layering
- –Results lean on a stylist who truly reads curl patterns
Layered Bobs for Light, Chic Curls

A layered curly bob keeps things short, chic, and light. Layers through the bob give the curls lift and stop the shorter length sitting dense, so the shape feels bouncy and modern. The layering also makes a curly bob far easier to manage than a blunt one-length version.
It flatters looser curls especially, though tighter coils carry a curly bob beautifully with the right shaping. Our curly bob guide covers length and styling if you are weighing the chop.
- Layers add lift so a short curl springs light and bouncy
- Easier to style than a blunt, one-length curly bob
- Works on loose curls and tight coils with tailored shaping
Curl-by-Curl Dry Cutting for Precision

The most precise way to layer curls is to cut them dry, curl by curl, in their natural state. The stylist shapes each curl individually so the finished layers land exactly where they should. This matters because curly hair shrinks as it dries, and a wet cut can finish far shorter and more uneven than planned.
Seek out a stylist who specializes in it. Expect a dry, curl-by-curl cut to run $80 to $150 or more depending on your area, and to take longer in the chair than a standard cut.
- Each curl is shaped where it actually falls when dry
- Accounts for shrinkage, so nothing finishes shorter than planned
- Worth booking a curl specialist; the precision shows in the result
Fringe Ideas for Layered Curls

A fringe frames layered curls, and there are a few ways to wear one. Soft curtain bangs part to frame the face, micro bangs make a bold, springy statement, and a full curly fringe sits soft across the forehead.
Whatever the shape, a curly fringe is cut dry to account for shrinkage, because curls spring up much shorter than they look wet. Cutting it wet is the quickest route to a fringe that finishes too short. A little leave-in keeps it defined, and most curly fringes grow out softly into face-framing pieces.
Managing Volume by Removing Bulk

Sometimes thick curly hair simply carries too much bulk to move freely. Strategic layering removes weight from dense curls so they breathe. The word that matters is strategic.
Strategic weight removal
Bulk comes out of the interior and the lengths. The ends stay full, since thinning them would leave them frayed and undefined. Done well, debulking lightens the hair and keeps every curl intact. The most common fix I make on thick curly heads is exactly this: weight out of the middle, ends left full.
The payoff is real. Thick curls dry faster, sit lighter, and feel far easier to live with, with the curl pattern fully preserved.
Layer Placement for Looser and Coily Curls

Where the layers sit should shift with your pattern, and this is the single thing that decides whether a layered curl works. Looser curls and waves carry longer, lower layers that let the length flow. Tighter coils want shorter, shape-building layers placed higher, so the coils rise and define at the crown. The same long layering that flatters a wave can leave a coil shapeless, which is why placement matters more than any one named style.
- Pattern dictates placement, every time
- Looser curls take longer, lower layers for flow
- Tighter coils take shorter, higher layers for lift
A Wash-Day Routine for Layered Curls

Good layers set curls up to define easily, and a simple wash-day routine brings out the best in them. The principle is to handle the curls gently while wet and then leave them alone to dry. Follow these four steps and most curl types fall into shape.
- Apply leave-in and a curl cream or gel to soaking-wet hair
- Scrunch upward to encourage the curls to clump and form
- Diffuse on low or air-dry without touching the hair
- Scrunch out any cast once dry for soft, defined curls
Upkeep and Trim Schedules

Layered curls are forgiving, but a little upkeep keeps them defined. Because curls hide grow-out well, layered curly hair stretches longer between trims than straight cuts, often eight to twelve weeks.
Between cuts, the main job is moisture. Hydrated curls spring and define, while dry curls fall flat. A leave-in, a water refresh, and a satin bonnet or pillowcase at night keep the curls and the shape healthy.
When you do trim, ask for a dry, shaping trim that follows the layers, so they stay balanced and the curls hold their spring. A quick shaping trim usually runs $40 to $70.
Styling Tips That Make Layers Last
A few habits keep layered curls defined between salon visits. Style on soaking-wet hair, always, because curl set while damp holds far longer than anything fixed once it has dried. Scrunch upward toward the scalp to build clumps and lift, and resist touching the hair while it dries, which is where most frizz starts.
At night, protect the shape with a satin bonnet or pillowcase, and in the morning revive flattened curls with a light mist of water and a pea of leave-in. Treat frizz as part of having curls; a little moisture brings the pattern back, no hot tool required.
Curly Layer Questions, Answered
?Should curly hair be layered or kept one length?
For most curls, layered. One length lets curly hair pile into a heavy triangle, and layers remove weight so each curl can spring and form. Very fine or sparse curls are the exception and need only light layering to keep their fullness.
?Should layered curly hair be cut wet or dry?
Dry, in the hair’s natural state, so the stylist can see how each curl falls and place the layers to match. A dry cut also accounts for shrinkage, which pulls the length up shorter as the hair dries.
?How often do layered curls need trimming?
Usually every eight to twelve weeks. Curls hide grow-out well, so you can stretch further than with a straight cut. Keep it a dry, shaping trim that follows the layers.
?Will layers make my curls frizzier?
Not when they are cut for your pattern. Frizz comes from dryness and rough handling. Keep the curls hydrated with a leave-in and protect them at night, and the layers stay defined.
Layers That Honor Your Curls
The best curly cuts work with the texture, not against it. They read the pattern, take weight out where it drags the hair down, and build shape where the curls need lift, so the natural pattern can do what it does best.
Find a stylist who cuts curls dry, choose the layer placement that suits your pattern, and keep the curls hydrated. Do those three things and layered curly hair springs, defines, and shows off exactly the texture you already have.


