
Curly clients walk into my chair quoting the same warnings. That layers will turn their curls into a triangle. That a wolf cut on curly hair only works in the photos. That short layers mean nonstop frizz. All three are myths, and all three trace back to curls being cut the wrong way.
Done right, the wolf cut might be the most flattering shape a curly head can wear. The whole game is cutting for your actual curl, dry and pattern by pattern. Below is how it works across loose waves, classic curls, and coily textures, with the styling, the shrinkage math, and the consultation that gets it right.
Quick Answers
Does the wolf cut really work on curly hair? Yes, beautifully, as long as it is cut dry so your stylist can read your true curl and account for shrinkage.
What should I budget? Around $80 to $140 for a curl-savvy stylist, with a shape-up every 8 to 12 weeks.
What is the biggest mistake? Cutting curls wet, which ignores shrinkage and leaves the shape far shorter and boxier than you wanted.
Why Curls Love a Shaggy, Textured Wolf

Curly hair and the wolf cut want the same thing: volume with somewhere to go. The shaggy, layered shape removes the weight that flattens curls at the root and stacks lift through the crown, so the curl pattern finally gets room to spring. That is why a good curly wolf looks fuller and lighter at the same time.
It also grows out kindly on curls, since the internal layers blend as they lengthen, so there is no hard line. A curly wolf cut is forgiving in a way blunt curly cuts are not.
- Removes root weight so curls lift instead of sitting flat
- Stacks volume through the crown for shape
- Grows out softly with no harsh shelf
Match the Length to Your Curl Pattern

Length is the first decision, and it should follow your curl pattern. Forget the length in the photo. Tighter curls and coils shrink more, so a cut that looks short on screen may sit far shorter on you. The first thing I do with a new curly client is dampen one section and watch it dry, just to measure how far it springs.
As a rule, looser waves can carry a shorter wolf, while tight coils want a little more length so the shape does not read cropped once shrinkage kicks in.
- Looser waves can go shorter and still keep shape
- Tighter coils need extra length to balance shrinkage
- Always judge length on dry, natural curl, with no stretching
📋Before your curly wolf appointment
- ✓A photo of your hair on a natural, good-curl day
- ✓Your curl pattern, from loose wave to tight coil
- ✓An honest note on daily styling time and product habits
Face-Framing Layers for Every Face Shape

Face-framing is where a curly wolf earns its keep, because the front pieces are what flatter your features. Round faces want longer framing that drops past the chin to add length, while longer faces do better with framing that starts higher at the cheekbone to add width.
On curls, the framing pieces are cut a touch longer than you think, since they spring up as they dry. I shape them to fall just where the curl settles, not where it hangs wet.
- Round faces: longer framing below the chin for length
- Long faces: framing from the cheekbone for width
- Square jaws: soft, curl-heavy framing to round the corners
An Airy Layered Wolf for Loose Waves

Loose 2a to 2b waves get the airiest version. The layers add bounce and break up any bulk, and because the wave is gentle, the cut can go a little shorter and still hold its shape. This is the easiest curly texture to wear a wolf cut on.
Style it with a salt spray scrunched into damp hair and a low diffuse, or simply air-dry. A wavy wolf cut keeps loose waves from going flat at the roots.
- Best for gentle 2a to 2b waves that want more movement
- Salt spray plus a low diffuse brings the bend out
- Air-dry for the softest, most undone finish
💡Pro tip
Wash, condition, and let your hair dry into its natural curl before a cutting appointment. Showing up with day-old, defined curls gives your stylist the truest map of your shape and shrinkage, which is exactly what a dry cut needs.
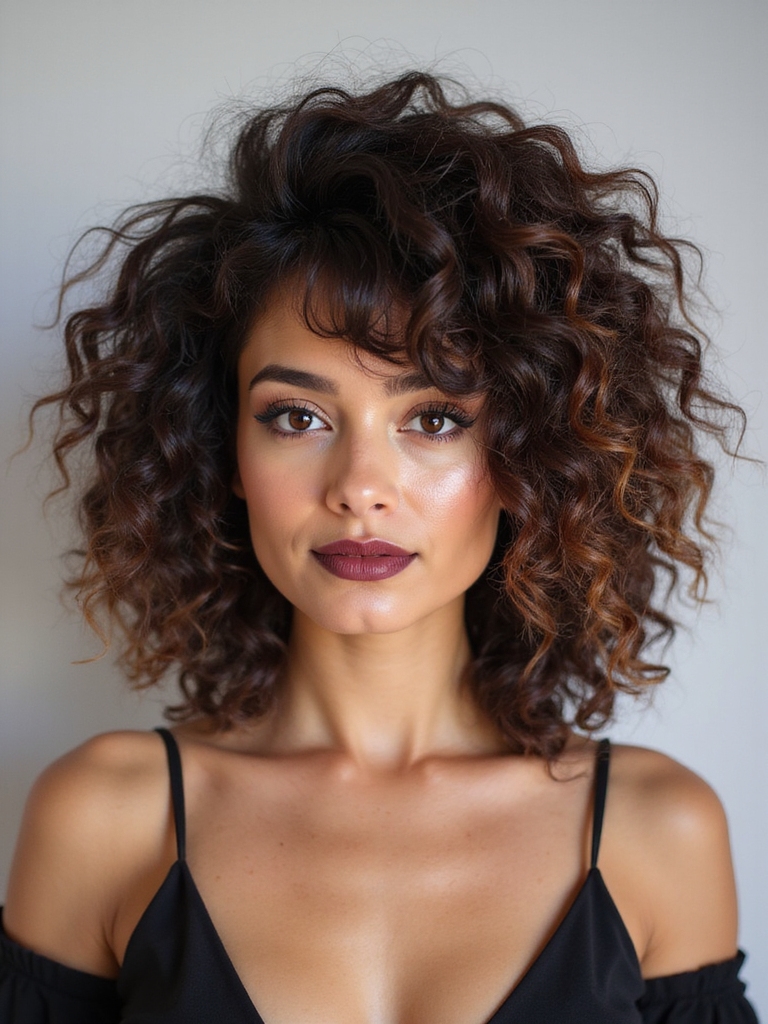
A Layered Wolf Cut for Classic Curls

Classic 3a to 3c curls are the sweet spot for a wolf cut, since they hold their shape and stack into real definition. Graduated layers let each curl spring free and settle cleanly, and the crown gains lift while the perimeter stays full enough to hold the silhouette.
Cutting on the curl, clump by clump
The cut has to be dry here so your stylist can follow the curl clump by clump. I have turned away more than one curly request that came in wanting a wet cut, because wet-cutting 3c curls is a gamble nobody wins.
Define with a curl cream and a light gel, then diffuse on low. Scrunch out the cast once it dries and the curls separate into glossy spirals.
Structured, Volumized Layers for Coily and Kinky Hair
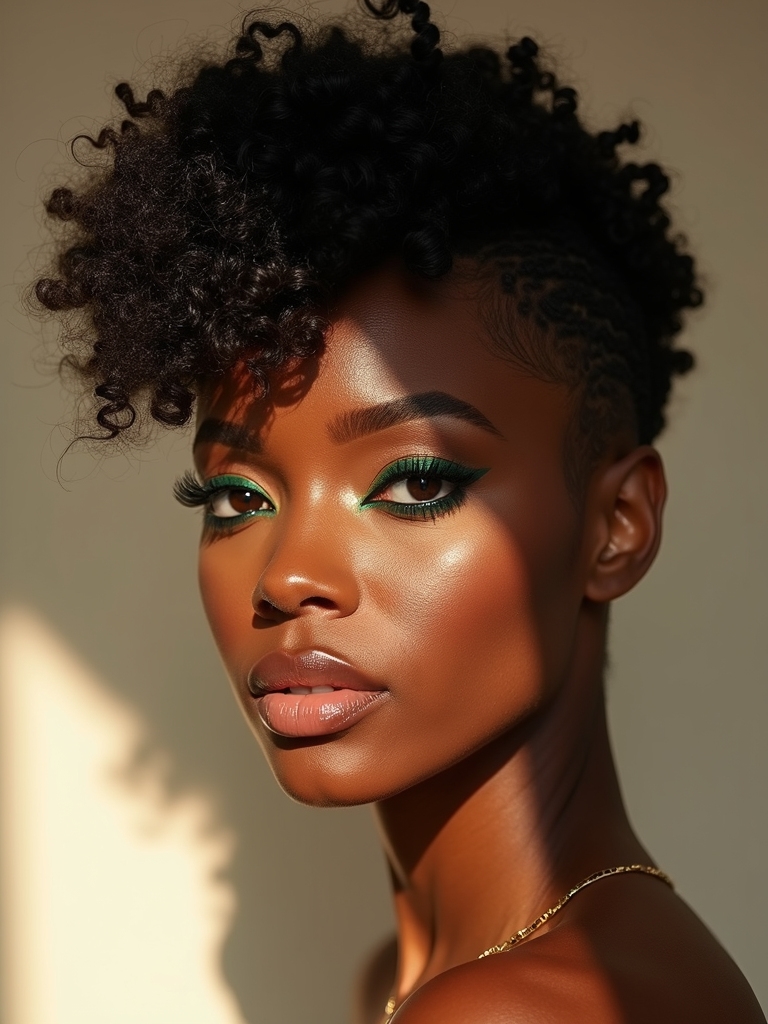
Coily and kinky 4a to 4c hair wears a wolf cut as a sculpted, rounded shape, and it deserves a stylist who cuts texture every day, so find that person before you book. The layers are placed to build a soft halo of volume, with the perimeter kept dense so the shape holds and the crown free to rise.
Honoring shrinkage on coily hair
This hair is always shaped dry, in its natural coil, so the cut honors the real pattern and the dramatic shrinkage that comes with it. Cut wet, a 4c wolf can lose several inches the moment it dries.
One care note that matters: keep tension light around the hairline and edges, skip tight nightly styles that pull, and protect the coils with a satin bonnet so the shape lasts between wash days.
| Curl pattern | Best length | Styling base |
|---|---|---|
| Loose waves (2a-2b) | Short to medium | Salt spray, low diffuse |
| Classic curls (3a-3c) | Medium | Curl cream and gel cast |
| Coily, kinky (4a-4c) | Medium to long | Cream, gel, satin bonnet |
Curl Maintenance and Managing Shrinkage

Shrinkage is not the enemy; it is information. Once you know how far your curl springs, you can plan length, framing, and trims around it, and wash day stops surprising you. The wolf cut works with shrinkage by building shape that looks right once the hair is dry and at its true length.
- Dust the ends every 8 to 12 weeks to keep the layers crisp
- Reshape the face-framing, not the length, between cuts
- Track how far your curl shrinks so length is never a surprise
Soft Shag vs Bold Mullet

Within the curly wolf family, you choose a vibe. A soft shag keeps the layering gentle and the length even, for a romantic, all-over cloud of curls that suits almost everyone.
A bold mullet pushes the crown shorter and leaves a defined curly tail at the nape, which reads edgier and more directional. It is the choice when you want the cut itself to make a statement.
If you cannot decide, a middle path keeps a shag base with a slightly bolder crown. A short curly wolf cut leans toward the bolder end of this scale.
🅰️Curtain Bangs
Soft and forgiving on curls; cut long for shrinkage, they frame the face with no hard line.
🅱️Micro Fringe
Bold and graphic, but high commitment on curls and tricky as it grows; best on defined 3a to 3b curls.
Dry-Cutting for Sculpted, Defined Shape

Dry-cutting is the technique that makes or breaks a curly wolf. Cutting each curl dry, in its natural state, lets your stylist see exactly how it falls and where it needs lightening, so nothing is left to guesswork.
Why dry-cutting beats wet-cutting on curls
It is slower than a wet cut and worth every extra minute. The stylist follows the curl, point-cutting and carving to release weight only where the shape needs it.
Ask specifically whether your stylist dry-cuts curls before you book. It is the single best predictor of a curly cut you will love.
Diffusing Roots-Up With a Minimal Touch

How you dry a curly wolf matters almost as much as the cut. The goal is lift at the roots and definition through the lengths, with as little disturbance as possible, because every extra touch trades definition for frizz. Diffuse on low heat, cup the curls up toward the scalp, and resist the urge to fuss. Hands off until it is dry.
- Diffuse on low heat to protect the curl pattern
- Cup curls up toward the roots for crown lift
- Hands off until fully dry, then shake out gently
The Lightweight Gel and Cream Cocktail

The right product mix keeps a curly wolf defined without weighing it down. The combination I lean on most is a lightweight curl cream for moisture layered under a light gel for hold, applied to soaking-wet hair. Too much product turns curls crunchy and limp. Build it thin and add only as needed.
- Cream first for moisture, gel over it for a flexible cast
- Apply to soaking-wet hair, then scrunch upward
- Scrunch out the dry cast with a drop of oil for shine
Color Contrast That Spotlights Curls

Color can make a curly wolf pop, since each spiral catches light differently and turns highlights into dimension. Brighter pieces placed at the crown and face frame light up every time the curls move, and a shadow root keeps the grow-out soft.
Protecting curl health through color
The texture of curls hides regrowth well, so color is lower upkeep here than on straight hair. Keep the lightening gentle, though, because curls are more fragile when processed.
Expect face-framing color to add roughly $120 to $250 on top of the cut, and use a bond-builder to protect the curl.
Half-Up Polish With a Satin Scrunchie

When you want the curly wolf to look pulled-together fast, a half-up style is the move. Gathering the crown into a soft satin scrunchie shows off the face-framing layers and the curly tail at once, and the satin protects the hair from the snag a regular elastic causes. It takes thirty seconds and reads intentional.
- Use a satin scrunchie to avoid creasing and breakage
- Gather only the crown so the framing pieces stay loose
- A few face curls left out keep it soft, not severe
Growing Out With Textured Control

Growing out a curly wolf is the easy part, which is one more reason curls suit it. As the layers lengthen they blend into the curl pattern, so there is no hard line and no awkward shelf to fight through.
To keep it tidy, reshape the face-framing every couple of months and let the rest grow. A soft wolf cut grows back into a longer curly shag almost on its own.
Your Curly Cut Consultation Checklist
The consultation is where a curly wolf is won or lost, so walk in prepared. Bring a photo of your hair on a good curl day, know your curl pattern, and be ready to talk honestly about how much time you spend styling. The right questions up front save you from a cut that does not fit your real routine.
- Confirm your stylist dry-cuts curls before you book
- Bring a photo of your curls on a real, unstyled day
- Say your styling time and your shrinkage so length is planned right
Cut for the Curl You Have
Every worry curly clients bring me about the wolf cut comes down to one fixable thing: a cut done for straight hair on a curly head. Shaped dry, layered for your real pattern, and styled with a light hand, the wolf cut gives curls lift, definition, and a shape that grows out without a fight. From loose waves to tight coils, there is a version that works with your texture.
Save this before your next appointment and lead with the consultation. Confirm your stylist dry-cuts curls, bring a real photo, and talk shrinkage first, because the cut that fits your curl is the one you will actually love living with.


