The word ‘cute’ applied to locs is specific. It is not formal and not bold and not dramatic. Cute locs have a lightness to them: a fresh top knot that sits just right, a half-up with two locs left loose at the temples, a low ponytail wrapped in silk that takes under three minutes to put together and looks like it took longer. The quality is in the combination of ease and intention.
These fifteen styles hit that combination. Some are for long mature sets; a few work at shoulder length or at the starter stage. All of them read as considered rather than hasty, and all of them leave room for the locs to be the point rather than something being managed into submission.
What Makes Cute Loc Styles Work
- The detail is usually small. One cuff, one scarf wrap, two face-framing locs left loose: these are the elements that shift a standard gathered style into a cute one without changing the basic structure of the look.
- Edge work matters more than the style itself. A half-up with smoothed edges reads as polished; the same half-up with unattended edges reads as a quick fix. The edges are the part that signals intention.
- Cute loc styles have personality. They reflect a choice, not just a default. An accessory that references something the wearer likes, a color that matches the outfit, a braid detail that is specific rather than generic: these are the markers.
- Accessories at the right scale complete the look. A statement cuff on a very small bun looks overdone; the same cuff on a larger bun or a full ponytail anchor reads correctly. Scale between style and accessory is the calibration that makes the difference.
- Most cute loc styles take under ten minutes. If it takes significantly longer, it is in a different category. The easy assembly is part of what makes these styles function across ordinary days rather than only for special occasions.
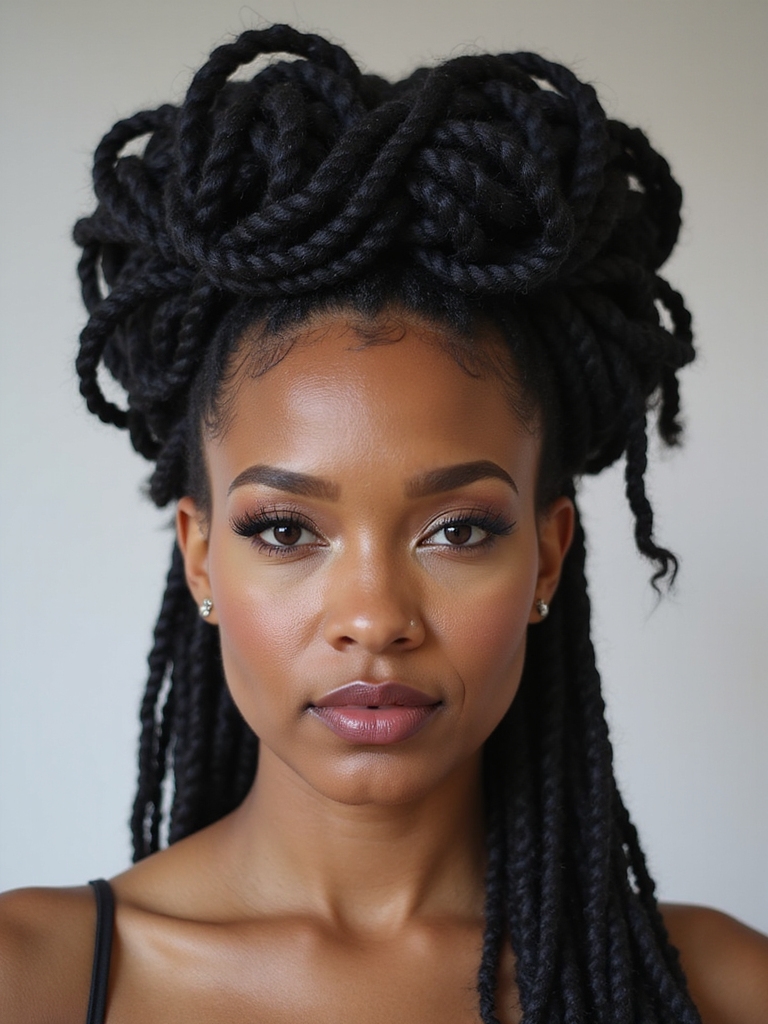
Half-Up Top Knot for Everyday Charm

The top knot sits at the highest point of the crown, coiled from the front third of the loc set and secured with a band or single pin. The remaining locs fall behind the shoulders in their natural column. The contrast between the small, tight coil at the top and the loose length below creates a layered silhouette that reads as considerably more considered than the assembly time suggests.
A cuff placed on one of the gathered locs before coiling sits at the base of the top knot in the finished style, adding a metallic detail that gives the arrangement a personality that would not be present with just the coil and band. The same top knot without the cuff is casual; with a single cuff at the base, it reads as a small style decision made deliberately.
Side-Swept Locs With Soft Tendrils

A deep part placed one to two inches from the usual center sweeps the front section of the loc set to one side. Before gathering or securing the sweep, two locs are pulled loose from the front and left to hang alongside the temples and cheeks. These face-framing tendrils do not need to match perfectly in thickness or length; a slight difference between the two sides reads as natural rather than mismatched.
The tendrils change how the face reads from the front more than any other single element of the style. Without them, the swept look frames one side of the face but leaves the other relatively bare.
With the tendrils, the face is framed from both sides, and the swept arrangement reads as a complete composition rather than a one-sided styling decision. A small bead or cuff on one tendril near the mid-length adds the kind of personal detail that makes the style feel specific to the wearer.
- Pull the tendrils loose before completing the main sweep so they fall naturally rather than being extracted from a formed arrangement, which tends to disrupt the direction of the surrounding locs.
- The tendril closest to the ear should sit slightly behind the ear rather than in front of it for the most flattering face-framing effect from most angles.
- Tendrils that are slightly waved from a previous rod set add more dimension at the face than straight ones at the same position.
Space Buns With Beads for Playful Vibes

A clean center part divides the loc set symmetrically, and each half is gathered at the same height on its respective side and coiled into a compact bun. On longer locs, the buns are full and rounded; on shorter sets, they are more compact but equally symmetrical and clearly intentional from the front and sides.
The beads placed on locs before assembling the buns become visible at the surface of each bun and at the base of the anchor where the gathered and free sections meet. Matching beads on both sides tie the two buns into a single coherent look rather than two independent decisions. Threading a few beads onto surface locs of each bun before assembly takes under two minutes and changes the reading of the style significantly.
The scale of the beads relative to the buns is worth considering. Small seed beads on a large bun are effectively invisible; a few medium to large beads on the same bun catch light and register as an intentional detail. Two or three statement beads per bun is usually enough: more creates a cluttered reading, fewer creates a scattered effect that does not land as clearly as a more concentrated placement.
Low Ponytail With Silk Scarf Wrap

The low ponytail is gathered at the nape and secured with a band, and then a square silk scarf folded into a long strip is wound several times around the anchor, covering the band and sitting flush against the gathered locs. The ends of the scarf are tied at the back of the anchor in a small knot or bow that stays visible from behind and from the side in photographs.
Choosing the Scarf for the Right Effect
A silk scarf in a contrasting color to the locs creates a high-visibility accent that reads from across the room. A scarf in the same warm tone as the locs reads as more understated and integrated.
Printed scarves, small patterns, and bold graphics all work at the anchor point of a low ponytail because the scarf is the featured detail and the locs frame it rather than competing with it. A scarf at least one hundred centimeters long allows enough wrapping to cover the anchor fully and still form a tidy knot at the back.
Braided Front Crown on Starter Locs

The front locs, from temple to temple, are gathered and flat-braided across the crown from one side to the other, pinned at the back with a single wide pin. The remaining locs fall from the back and sides in their natural state. The braided crown is the only structured element, and the contrast between the structured front and the free back reads as a deliberate style decision rather than a mix of finished and unfinished.
This style is particularly well suited to starter locs because it uses the limited length at the starter stage as a feature rather than working around it. The short front sections, usually too brief to gather into a full updo, are exactly the right length to form a flat crown braid. Two or three small pins pressed into the braid at intervals, rather than just one at the end, keep the crown flat against the head during movement.
High Puff With Curly Loc Ends

The locs are gathered at the crown with a wide band and allowed to fan outward from the anchor rather than being coiled into a compact bun. The curled ends, set on flexi or perm rods the night before, contribute spiral movement at the tips of each loc that radiates outward from the puff’s center, creating a shape that is simultaneously full and textured in a way that neither a plain puff nor a rod set alone achieves.
Building the Puff to Maximize Volume
The band should be positioned at the very top of the crown rather than a few inches below, which keeps all the loc volume above the anchor and produces the fullest possible puff shape.
On loc sets with enough length to be gathered but not long enough to fall in a column, the high crown placement is especially important: a band two or three inches lower drops some of the loc volume behind the anchor and reduces the apparent fullness of the puff significantly.
A wide satin-covered band distributes the tension across a larger root area and prevents the kind of traction that narrow bands create at the crown. For wearers who tie the puff daily, rotating the anchor position a half-inch toward the front or back between sessions prevents cumulative root stress at any single point.
Quick checks before putting the style together:
1How do I know if the edge work is good enough?
Check the hairline along the temples and nape in a mirror, then take a photo. The camera reveals edge work more clearly than the mirror does, particularly in the area just in front of the ears where natural texture tends to reappear faster than other sections of the hairline. If the edges look clean in the photo, they will read cleanly at any distance during the day.
2Should the accessories match the outfit or the locs?
Either works, but matching to the outfit tends to produce a more cohesive overall look. The locs are a consistent element across all occasions; the outfit changes. Accessories that key off the outfit color or material connect the hair to the specific day’s look rather than sitting as a neutral constant across all looks.
3How do I keep a cute loc style looking fresh past midday?
Most cute loc styles hold their structure without intervention once assembled correctly. The elements that tend to slip are the edges and, for half-up styles, the anchor position. A small amount of edge-control product carried in a bag and applied with a fingertip at midday resets the hairline without requiring a mirror, and re-pinning the anchor of a half-up takes under thirty seconds.
Sleek Bun With Statement Cuffs

The statement cuffs are slid onto two or three of the locs that will sit at or near the outer surface of the finished bun, then the full set is gathered and the bun is assembled. The cuffs end up positioned along the visible outer locs of the bun, catching light from the sides and above during the day. The sleek, gathered bun is the structure; the cuffs are the personality.
For the bun to read as truly sleek, the edge work needs to match the level of finish suggested by the statement cuffs. Clean, smoothed edges along the temple and nape hairline bring the whole style into alignment: a bun with statement cuffs and rough edges sends a mixed signal that reduces the intentionality of both. The edge work and the cuffs together are what make this style read as deliberately considered rather than quickly assembled.
- Place the cuffs on locs that will sit near the top and sides of the assembled bun rather than at the base, where they would be obscured by the locs folded around them.
- Gold cuffs read as warm and celebratory; silver reads as cooler and more professional; rose gold bridges both qualities and tends to work across most skin tones.
- Cuffs placed on two locs rather than one or three create a visual balance that is easier to achieve than either a single statement piece or a larger scatter.
Half-Up Heart-Shaped Braid Accent

The heart shape is formed by parting a small section of locs at the crown into two equal parts, braiding or twisting each half inward toward the center in a curve that meets at a downward point, and pinning the two halves where they join. The remaining locs from that section fall through or below the heart shape, while the rest of the loc set is gathered in the half-up arrangement around it.
This detail works best on loc sets with enough section density at the crown to produce two braids or twists that read as clearly separate from the surrounding locs. Very thick loc sets where each individual section is wide may struggle to produce the fine curve needed for the heart shape; fine or microlocs create the clearest, most defined version.
A pearl or crystal pin at the bottom point of the heart, where the two twisted sections meet, accents the detail and keeps the join point visible and finished.
Butterfly Clips on Shoulder-Length Locs
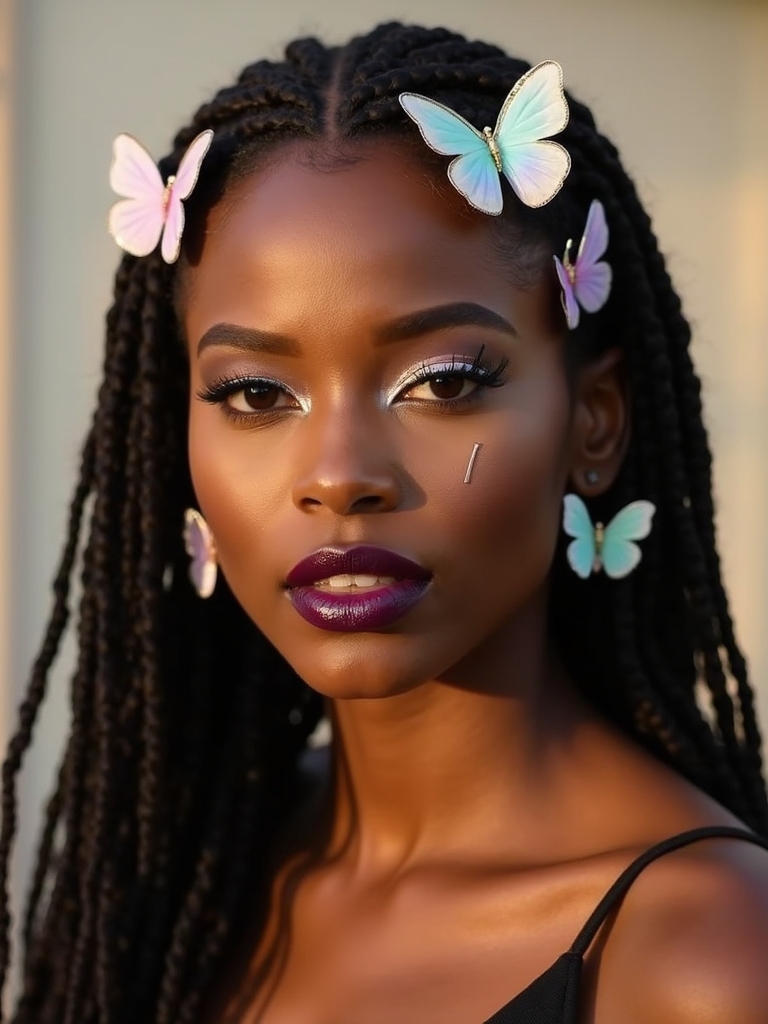
A butterfly clip pressed open and clamped over a section of the loc set at the crown or along the side of a low ponytail adds a visible decorative element that requires no pinning skill and no product. The clip holds a portion of the locs in a folded position, leaving the rest to fall naturally around it, and introduces color, texture, or sparkle depending on the clip material and design.
Two clips placed symmetrically on either side of a center part, or one oversized clip positioned asymmetrically at the back of the head, are the most common configurations. The placement relative to the part determines how the clips read from the front: symmetrical placement reads as balanced and conventional; asymmetrical placement reads as individual and less expected.
Butterfly clips work particularly well for wearers who are in the teenage or shoulder-length stage of loc growth, where the limited length restricts more complex updo options. The clips add a level of style completeness that does not require the locs to have reached their eventual mature length. Iridescent, pearlescent, or tortoiseshell clips tend to read as the most versatile choices, working across both casual and semi-formal settings.
Chunky Two-Strand Twists for Volume

Two or three locs are combined and wound around each other in a consistent direction from root to tip, forming a cable section that is significantly thicker and more defined than any of the individual locs alone. Across the full set, these cable twists produce a loc arrangement that is bolder and more graphic than the same locs worn individually.
How Long Chunky Twists Stay In
Two-strand twist styles made from locs hold reliably for two to four days before the cable tension begins to unwind at the root. Wearing a satin bonnet overnight is the most effective way to extend the twist life past the first day.
The twists release cleanly by simply unwinding them in reverse, with no damage to the loc body underneath, which makes this one of the most low-commitment style variations available for any stage of loc growth from teenage onward.
Color-Peek Highlights With Wraps

A peekaboo highlight colors only a small number of locs beneath the surface layer of the full set, visible when the locs part or move but not prominent from the front at a glance. A thread wrap winds a length of colored or metallic thread around a few of the same highlighted locs, covering the top few centimeters in a tight spiral that contrasts with the natural loc surface below the wrap.
The combination of the hidden highlight and the visible wrap on the same or adjacent locs creates a layered effect: the wrap draws attention to the section at the surface, and the highlight appears below it when the loc moves. Metallic gold thread wraps on locs with warm copper highlights produce the most cohesive version of this combined look; contrasting thread and highlight colors create a more graphic, eclectic reading.
- Apply the wraps before the highlight appointment so the colorist can see exactly which locs will be wrapped and plan the highlight placement accordingly.
- Thread wraps can be positioned anywhere along the loc length; wraps placed near the tip leave the most highlighted section visible above them when the loc hangs.
- Remove thread wraps by cutting the wrap material at the top and bottom with small scissors and then unwinding carefully; do not pull the thread off by force, which can snag the loc surface.
Messy Boho Updo With Loose Pieces

- Build the base updo loosely: Gather the main loc set at mid-height or the nape and pin it into an open, loosely coiled shape. The base does not need to be perfectly symmetrical; a slightly irregular coil is part of the boho reading. Use the minimum number of pins needed to keep the main shape from fully falling apart, rather than pinning tightly from every direction.
- Pull deliberate loose sections: From the assembled updo, extract two or three locs from the outer edge on each side and allow them to hang alongside the face and neck. Pull a few more from the body of the updo and allow their ends to escape the pin line at the back. These escaped sections should be placed with intention: they should hang where they frame the face best, not where they happen to fall.
- Smooth only the edges: Apply a small amount of edge-control product along the hairline only, leaving the escaped sections and the main updo with their natural surface texture. The smoothed edge at the perimeter is the element that distinguishes a deliberate boho updo from simply unmaintained hair — the contrast between the clean hairline and the loose, textured style above it signals that the looseness is chosen.
Side-Parted Lob With Barrel Curls

At shoulder length, locs create a natural bob line that moves with the wearer. A side part placed one to two inches from the center adds an asymmetry that gives the length a more considered quality than a centered arrangement. Rod-set ends add spiral movement at the tips that changes how the lob reads in both profile and front-facing views: the curled tips catch light at the edge of each loc and create visual interest at the hemline of the style.
This look requires no pinning and no accessories to read as complete, which makes it one of the more practical everyday styles for loc wearers at shoulder length. A single wide-tipped pin at the temple on the larger side of the part keeps the front section from sliding forward over the eye during the day without changing the open quality of the side-parted lob arrangement.
Which cute loc style suits your current setup:
Long mature locs
The high puff with curly ends, the loc petals bun, or the low bubble ponytail. All three use the full length and weight of mature locs as the primary material and work best when the loc set has enough length to show the effect clearly.
Shoulder-length or lob locs
The side-parted lob with barrel curls, the low ponytail with scarf wrap, or the butterfly clips arrangement. These styles work with the natural bob line of shoulder-length locs rather than requiring more length than is currently available.
Starter or teenage locs
The braided front crown, the half-up top knot, or the half-up heart braid accent. Each uses the front locs for a structured detail and leaves the shorter back locs in their natural state, which is the approach that works best when the full set does not yet have enough length for gathered updos.
Loc Petals Bun for Special Occasions

Loc petal folds are built by folding individual locs or small groups of locs back on themselves toward the scalp and pinning the fold flat, creating rounded leaf-like shapes. When arranged in overlapping rows around a gathered center bun, the petals create a pattern across the surface of the updo that reads as architectural and deliberately crafted from every angle.
Building the Petal Arrangement Efficiently
Start from the outer edge of the bun and work inward, placing each petal fold so it overlaps slightly with the fold before it. Working from the perimeter inward maintains access to each section as the arrangement is built, rather than blocking outer sections with interior folds that have already been pinned.
Broad-tipped pins pressed parallel to the scalp rather than pushed straight through the loc hold each petal fold in position without creating a bumpy surface that disrupts the outer folds placed afterward.
Pearl-tipped pins placed at the visible join point of each petal fold, where one petal ends and the next begins, add decoration and reinforce the pin work simultaneously. Four or five pearl pins distributed around the arrangement are sufficient; more begins to compete visually with the petal pattern itself.
Low Bubble Pony With Ribbon Detailing
The low bubble ponytail applies additional bands at three to four inch intervals down the length of the gathered locs, spreading the locs slightly outward between each band to form the bubble effect. A short length of ribbon is tied at each band, with the ends cut or frayed to hang loosely alongside the gathered locs. The ribbons add color and movement to the style at each bubble point along the length of the ponytail.
The ribbons do not need to match: alternating colors from the same color family, or ribbons in two contrasting colors alternated across the length of the ponytail, read as a deliberate palette choice that adds a graphic quality to the arrangement. Satin ribbon holds better than cotton at the band point and has less friction against the loc surface, which keeps the tied sections from shifting position during movement.
- Use the same width of ribbon at each band so the visual rhythm of the bubble ponytail reads consistently from top to bottom rather than becoming wider or thinner as the eye moves down the length.
- Tie the ribbon in a simple knot rather than a bow if the locs are worn during physical activity; bows catch more easily on collars, jacket openings, and similar surfaces during movement.
- Very long locs may require five or six bands to produce the full bubble effect across the whole length; shorter locs at shoulder length may require only two or three to read clearly as a bubble arrangement.
Cute Dreadlocks Hairstyles Questions Answered
What makes dreadlock styles cute rather than just functional
The difference between a cute loc style and a purely functional one is in the intentionality of the small details: a face-framing tendril left loose, an accessory at exactly the right scale, an edge line that has been smoothed before leaving the house. These small choices signal that the style was put on rather than just gathered out of the way.
Cute loc styles also tend to leave the personality of the wearer visible in the styling choices. An accessory that reflects a personal aesthetic, a scarf in a specific color, or a braid detail at the crown that the wearer invented for their own set: these are the markers that distinguish a personalized cute style from a generic one.
How do I make my locs look cute at the starter stage
Short starter locs have a specific set of styling options that work with the limited length rather than against it. The braided front crown, the half-up top knot using only the front sections, the half-up heart braid accent, and the high puff with edge work are all styles that function specifically at the starter stage. Butterfly clips add a cute styling layer without requiring any length at all.
The most important element for cute starter loc styling is the edge work. Clean, smoothed edges make short locs read as intentionally styled at any length, and the contrast between the tidy hairline and the textured starter loc body is what gives early-stage locs their particular style quality.
How often should I change up my everyday cute loc style
There is no required rotation, but most loc wearers find that changing the style or accessories a few times a week keeps the overall look feeling fresh rather than stuck. The same gathered ponytail in a different position, or the same half-up with a different accessory, reads as a new style to most observers while taking minimal additional time.
The loc set itself creates enough baseline variation across a week, as the edges settle and the locs move differently at different points between retwist appointments, that even the same basic style reads slightly differently from day to day.
Do cute loc styles work for professional settings
Yes. Most of the styles in this gallery work in professional settings when the edge work is clean and the accessories are at an appropriate scale for the specific environment. The high puff with curly ends, the sleek bun with statement cuffs, the half-up top knot, and the side-swept locs with tendrils all read as professional in most office environments.
The space buns and butterfly clips are better suited to creative industries or casual workplace settings where personal expression in styling is more openly accepted.
Cute Is the Most Honest Standard
The most honest evaluation of a loc style is not whether it is formal enough or dramatic enough or professional enough. It is whether it is cute: whether it reads as a considered choice made by a person who knows what they like and put something on that reflects that. These fifteen styles start from that standard.
Choose one that fits the locs as they are today, add the one detail that makes it yours, and smooth the edges before leaving the house. That is the whole formula.